Tools and Supplies:
- 2-3 cans of Black Rust-Oleum Spray Paint (Glossy) for plastic
- 1 can of Yellow Rust-Oleum Spray paint for plastic
- 1 can of Chrome Rust-Oleum Spray paint for plastic
- Philips screw driver
- Finishing sand paper (if you have an old beat up cozy coupe you are using)
- painters tape
- cardboard to spray paint on and for blocking mist
- exacto knife
- silicone clear caulk (optional)
- Little Tikes Cozy Coupe
- Some old small paint brushes (for touch ups)
- White Distilled Vinegar
Instructions:
1. Disassemble your cozy coupe. I used an old police car Cozy Coupe (with the eyes). My in laws had it in their backyard from when K was younger, and their dogs chewed on it a bit.
2. Clean every nook and cranny with soap and water, rinse really well, and the wipe down with vinegar, rinse well, then let pieces dry completely.
3. Lightly sand any the cozy coupe if needed or desired. If your Cozy Coupe is in decent shape I would skip this portion. I was not so lucky. The dogs had left some nice gouges and partially eaten the gas cap.

3. Dust off or rinse all sanded parts to remove any particles, then let dry.
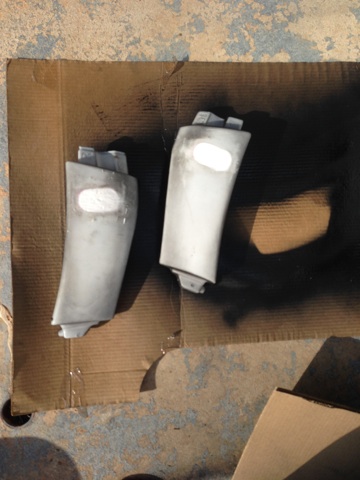
4. Spray paint the head lights and tail lights yellow. Spray paint any other pieces you may want yellow at this time (key, ignition, gas cap, door lock, little white screw covers) and set aside to dry.
 5. Since I used a cozy coupe with eyes, I removed the eyes and the filled the top portion of the holes with silicone caulk to prevent dirt/water/bugs from crawling into the small holes. I also filled in all the Little Tikes logos so I could create a flush surface to paint on. While it was wet I used a paint scraper to remove excess caulk and to make perfectly flat fillings. Let dry till clear, and then remove any excess caulk by gently rubbing off or cut off by using a knife, then rubbing to remove.

6. Cover/tape head lights then spray paint the Cozy Coupe Glossy Black. Be sure to follow the directions on the can to achieve the best results. Let dry overnight.


7. Choose where you want to place your batman logo, and print out the bat symbol. I used this one I pulled from a google search. I enlarged it and shrunk it down to fit where I wanted the symbol. I used two small symbols to cover the Little Tikes emblems on the “frame”, a medium for the front and back, and two large ones for the side/door.
![]()
8. I overlapped some pieces of painters tape onto a cutting board to form a big rectangular sticker, I then used some glue stick to glue the emblem onto the top of the tape, and then I used an exacto knife to cut out the decals. Gently life decals and apply to desired areas.


9. Cover the surrounding areas so that yellow mist doesn’t ruin your previous work (If you do get some yellow mist spray some black paint onto the cardboard and use a paintbrush to touch up). Use the yellow spray paint to achieve an amazing batman decal. Let dry overnight or until completely dry before removing the tape.

10. After applying all the decals, allowing to dry, and then removing all the tape, you may feel the need to use a small paint brush and go back to touch up the decals. To do this I just spray a small amount of the paint onto some excess cardboard and then paint cleaner more defined edges.
11. Cover cozy coupe and black portions of the wheels. Spray the “rims” chrome for an added touch. I cut a circle in a decent sized piece of paper and used it to block me from painting the wheels. I then touched the wheels up with black spray paint where it was needed with a paint brush.
12. Reassemble! Double check it is dry every where, and then let your kid cruise around in his/her new Batmobile!

G cruising in his Batmobile.
All photos are my property, and they may not be used without my permission.